
My first introduction to high precision reference clocks came about in the late 1990s. There within the cabinets of servers Netscape had a pair of HP 5071A Cesium Primary Frequency Standard rackmount devices. They were part of the local NTP network that all the switches, routers, servers, and satellite communications devices used to stay in sync.
While I may never get my own cesium reference clock, I’d still like to have accurate time on my clocks. With an inexpensive Raspberry Pi and a cheap GPS chip, you can build a stratum 1 time source ganged off the cesium clocks circling in low Earth orbit.
Pi Time Prep
Parts bin
Here’s what I used. You can use similar bits, but your specific configuration settings, wiring, results, etc may end up different from mine.
- Raspberry Pi 3 Model B
- Running Raspbian Jessie. I went with Lite, as I’m running headless w/o a GUI.
- GPS Breakout
- A Breadboard and an optional GPIO Breakout
- Various tubes and wires and careful notes, but please leave your antiquated notions at the door.
Update and Preparing the OS
First thing is a bit of general maintenance to make sure the OS is up to date.
sudo apt-get update
sudo apt-get upgrade
GPS and PPS software
Let’s pull down some of the software we’re going to need. The following adds support and tools for GPS access over serial or USB, and PPS on a GPIO pin.
sudo apt-get install gpsd gpsd-clients python-gps pps-tools
Kernel and OS setup for Serial and PPS GPS Access
There are a few things we need to prepare before we reboot our Pi. We need to enable kernel module support for PPS and UART through the Pi’s GPIO interface. Serial console support needs to be disabled. And GPSd has to be configured to start on boot and access the correct serial interface.
There are some additions needed in the /boot/config.txt. These
enable the software UART and associate a GPIO pin for PPS. Open
/boot/config.txt in your preferred editor (e.g. vi, nano, emacs) and
append the following:
dtoverlay=pps-gpio,gpiopin=18
enable_uart=1
core_freq=250
The first line enables PPS support throug GPIO 18, physical pin 12.
The second line enables the software driven UART. The last line forces the
Pi CPU clock speed to be fixed since the Pi 3 software UART syncs to
the CPU clock. If the CPU clock varies, then your baud will vary and
you’ll get garbage on the line. This
post
explains the clock issue along with various fixes and re-enabling the
hardware UART which disables the onboard BlueTooth.
Note: core_freq entry should not be necessary on Pi 3 with firmware
after May 2016.
Next, let’s disable the serial console. For the kernel side, edit the
/boot/cmdline.txt file. It should contain a single line. You are
looking to remove the portion that reads
console=ttyAMA0,115200
or console=serial0,115200 or console=ttyS0,115200. If your
/boot/cmdline.txt contained the either of these, then use that
instead of ttyAMA0 for the following commands.
sudo systemctl stop serial-getty@ttyAMA0.service
sudo systemctl disable serial-getty@ttyAMA0.service
Enable the PPS module to be automatically loaded on boot by adding the following to /etc/modules:
pps-gpio
GPSd Configuration
To make gpsd start on boot and use the correct serial line. Edit the /etc/default/gpsd so that is looks as follows.
# Default settings for the gpsd init script and the hotplug wrapper.
# Start the gpsd daemon automatically at boot time
START_DAEMON="true"

# Use USB hotplugging to add new USB devices automatically to the daemon
USBAUTO="true"

# Devices gpsd should collect to at boot time.
# They need to be read/writeable, either by user gpsd or the group dialout.
DEVICES="/dev/ttyS0"

# Other options you want to pass to gpsd
GPSD_OPTIONS="-n"
## -n starts the daemon polling the GPS device regardless of any
## client requests.
Enable GPSd at boot:
systemctl enable gpsd
Now power down your Raspberry Pi so you can wire it up.
sudo shutdown now
Wiring it up
For my setup, I wired the Adafruit GPS breakout to the Pi for both serial and PPS (pulse per second) usage. The former, with the gpsd libary and tools, provides access to all the GPS information (fix status, satellites tracked, latitude, longitude, altitude, time, velocity, direction, etc). Unfortunately, the data received over the serial line tends to be delayed making the clock output less accurate than we need. The PPS signal, though, is what we’ll use for accurate time.
From the GPS module, power is supplied via the 3.3v lines of the GPIO
header. GPIO pin 1 for +3.3v to the Vin on the GPS board, and pin 39
for ground respectively. Any of the other ground pins would work
equally well, pin 39 just lead to slightly cleaner wiring on the
breadboard.
The RX (receive) and TX (transmit) pins from the GPS connect to Pi
header pins 8 (UART0 TX) and 10 (UART0 RX) respectively. Yes,
this appears to be swapping pins, but realize that the pin labels are
done respective to the device. Hence the TX (transmit) from the GPS
is received by RX of the Pi and vice versa. Lastly, the PPS from the
GPS module connects to GPIO 18, pin 12 on the Pi header.
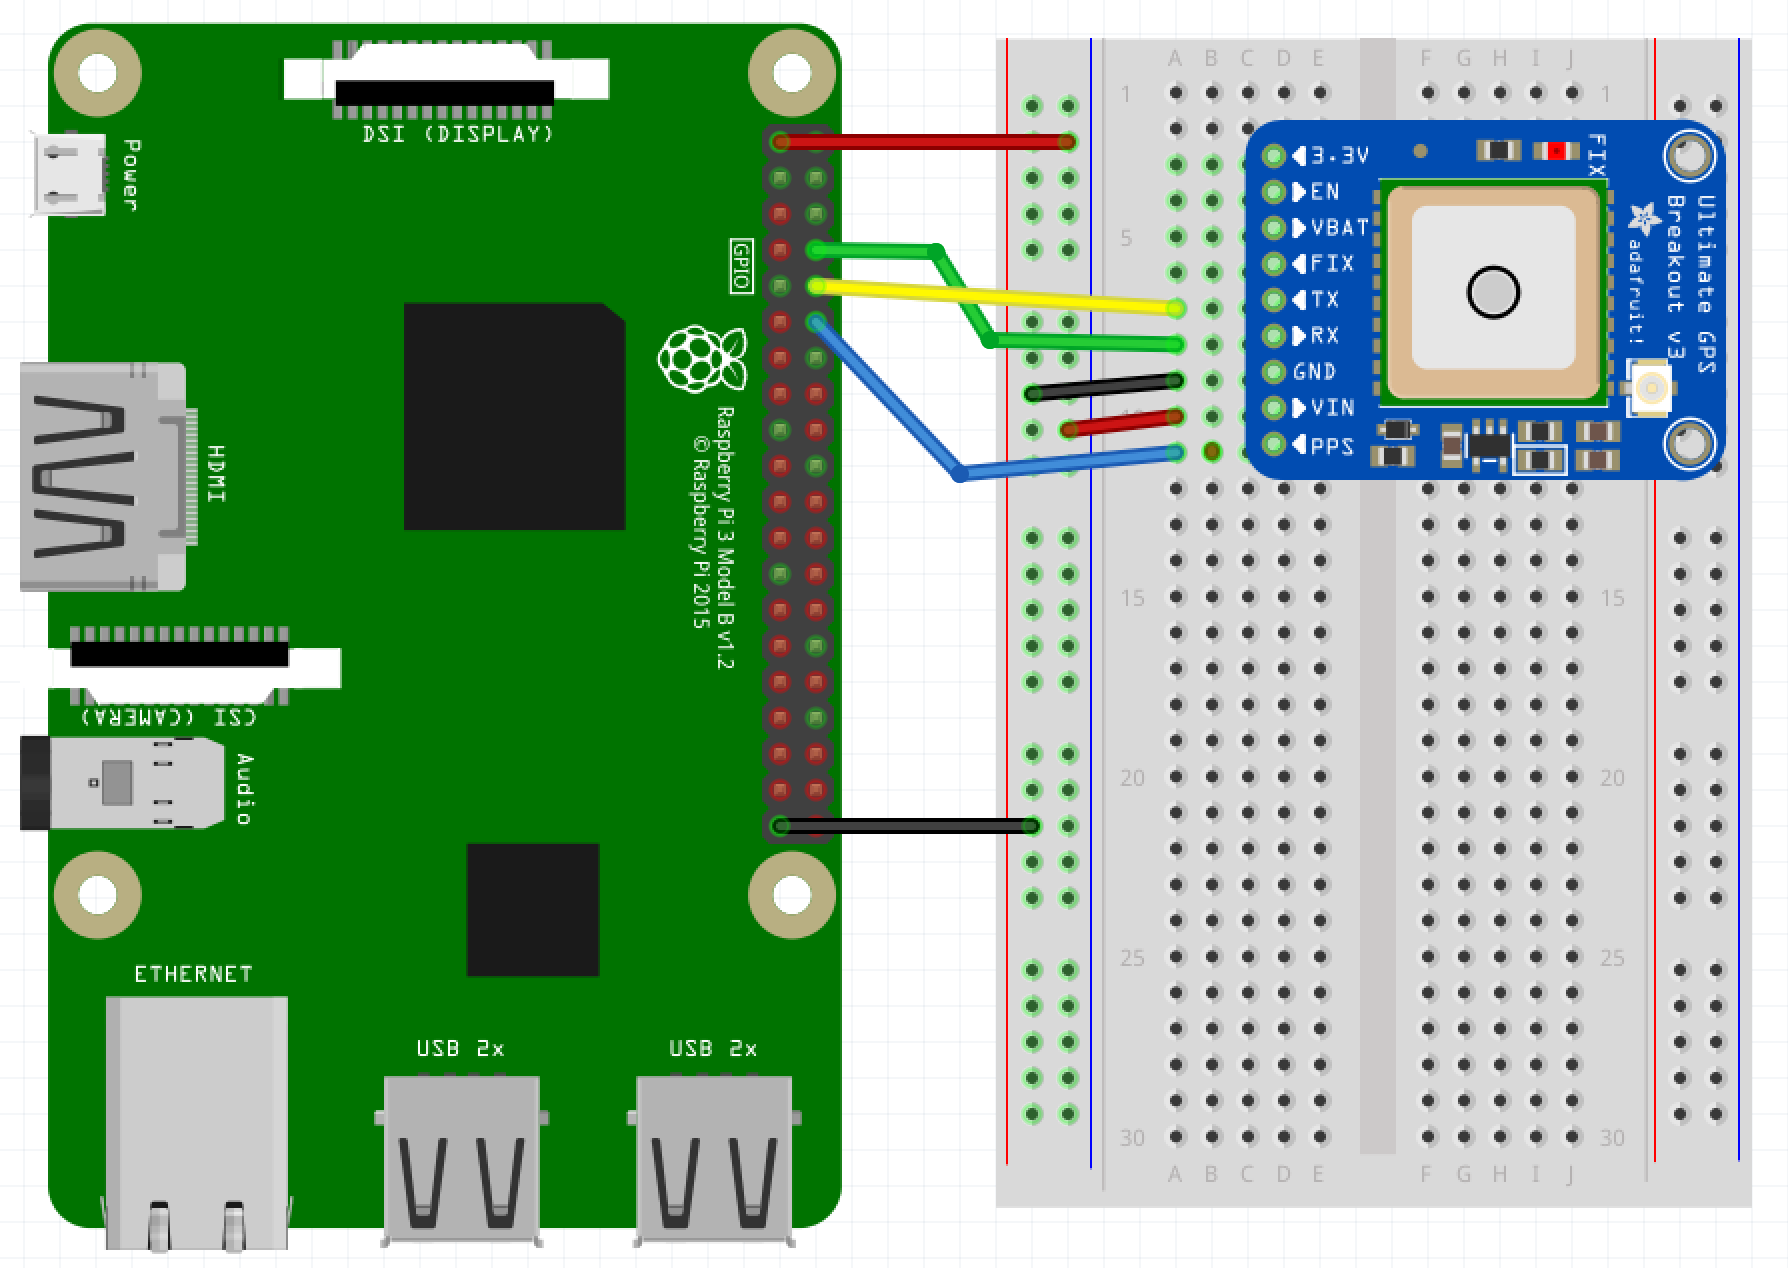 Simple breadboard layout
Testing the Setup
Once everything is connected, boot your Pi, and login. The light on
the GPS board should be flashing at this point. Once a second while
getting a fix, then once every 15 seconds after getting a location
fix. You can also run cgps -s and should get an output similar to
the following.
┌───────────────────────────────────────────┐┌─────────────────────────────────┐
│    Time:       2016-11-05T04:49:21.000Z   ││PRN:   Elev:  Azim:  SNR:  Used: │
│    Latitude:    37.507204 N               ││  23    68    086    19      Y   │
│    Longitude:  122.280356 W               ││   9    66    332    39      Y   │
│    Altitude:   82.7 m                     ││   7    49    272    42      Y   │
│    Speed:      0.8 kph                    ││ 135    45    197    28      Y   │
│    Heading:    341.0 deg (true)           ││  16    41    053    00      Y   │
│    Climb:      0.0 m/min                  ││   3    26    175    17      Y   │
│    Status:     3D FIX (53 secs)           ││  30    20    255    28      Y   │
│    Longitude Err:   +/- 2 m               ││  27    15    102    15      Y   │
│    Latitude Err:    +/- 2 m               ││  26    15    041    18      Y   │
│    Altitude Err:    +/- 4 m               ││  22    11    166    17      N   │
│    Course Err:      n/a                   ││   8    08    139    00      N   │
│    Speed Err:       +/- 18 kph            ││   6    06    271    25      N   │
│    Time offset:     0.704                 ││   2    01    304    00      N   │
│    Grid Square:     CM87um                ││                                 │
└───────────────────────────────────────────┘└─────────────────────────────────┘
The above is output from a Pi w/ GPS sitting by a window for about 20 hours continuously. The error ranges have settled down well at this point. Although, if I had been paying more attention, the error ranges probably settled down after 30 minutes or less.
To validate that PPS has been loaded into the kernel run dmesg | grep
pps. The output should be similar to the following:
[    3.521775] pps_core: LinuxPPS API ver. 1 registered
[    3.524980] pps_core: Software ver. 5.3.6 - Copyright 2005-2007 Rodolfo Giometti <giometti@linux.it>
[    3.539334] pps pps0: new PPS source pps.-1
[    3.539400] pps pps0: Registered IRQ 184 as PPS source
[ 3656.084308] pps_ldisc: PPS line discipline registered
[ 3656.087249] pps pps1: new PPS source serial0
[ 3656.087587] pps pps1: source "/dev/ttyS0" added
To check that PPS is working run sudo ppstest /dev/pps0. The output
will be similar to:
trying PPS source "/dev/pps0"
found PPS source "/dev/pps0"
ok, found 1 source(s), now start fetching data...
source 0 - assert 1478332335.000000859, sequence: 187520 - clear  0.000000000, sequence: 0
source 0 - assert 1478332336.000000724, sequence: 187521 - clear  0.000000000, sequence: 0
source 0 - assert 1478332337.000001165, sequence: 187522 - clear  0.000000000, sequence: 0
Hit ctrl-C to stop ppstest. source lines should start coming in
a <1 second intervals almost immediately upon running the command. If
not, make sure that the PPS wires are appropriately connected and that
you have a GPS fix.
Get Your NTP On
Update the NTP Daemon
As of October 2016, the supplied ntp package does not support PPS. We’ll need to download the latest source and compile it ourselves. The release that I used was the most current stable at the time, 4.2.8p8. Check https://www.eecis.udel.edu/~ntp/ntp_spool/ntp4/ to find the latest version as there may’ve been bug or security fixes. Download the source and run the following:
wget https://www.eecis.udel.edu/~ntp/ntp_spool/ntp4/ntp-4.2.8p8.tar.gz
tar xzvf ntp-4.2.8p8.tar.gz
cd ntp-4.2.8p8
./configure  –enable-linuxcaps
make -j5
sudo make install
The default installation location for the binaries is /usr/local/bin
and /usr/local/sbin. You could copy from there in to /usr/bin and
/usr/sbin overwriting the package provided binaries, but I chose to
leave those in place. Instead I altered the startup script by
changing the DAEMON line in /etc/init.d/ntp to:
DAEMON=/usr/local/sbin/ntpd
Now you can stop, reload the systemd setup, and start ntp back up and it will use your newly built version.
sudo systemctl stop ntp
sudo systemctl deamon-reload
sudo systemctl start ntp
Running sudo systemctl -l status ntp will show that you are now
running ntp from the /usr/local/sbin/ntpd binary:
● ntp.service - LSB: Start NTP daemon
   Loaded: loaded (/etc/init.d/ntp)
   Active: active (running) since Sat 2016-11-05 07:27:57 UTC; 55min ago
   CGroup: /system.slice/ntp.service
           └─14031 /usr/local/sbin/ntpd -p /var/run/ntpd.pid -g -u 106:111

Nov 05 07:27:57 andy-pi ntpd[14031]: restrict 0.0.0.0: KOD does nothing without LIMITED.
Nov 05 07:27:57 andy-pi ntpd[14031]: restrict ::: KOD does nothing without LIMITED.
Nov 05 07:27:57 andy-pi ntpd[14031]: Listen and drop on 0 v6wildcard [::]:123
Nov 05 07:27:57 andy-pi ntpd[14031]: Listen and drop on 1 v4wildcard 0.0.0.0:123
Nov 05 07:27:57 andy-pi ntpd[14031]: Listen normally on 2 lo 127.0.0.1:123
Nov 05 07:27:57 andy-pi ntpd[14031]: Listen normally on 3 eth0 192.168.1.92:123
Nov 05 07:27:57 andy-pi ntpd[14031]: Listen normally on 4 lo [::1]:123
Nov 05 07:27:57 andy-pi ntpd[14031]: Listen normally on 5 eth0 [2602:306:cd0c:5a70:c264:27a4:11a7:c4f0]:123
Nov 05 07:27:57 andy-pi ntpd[14031]: Listen normally on 6 eth0 [fe80::8209:2b06:79f4:2032%2]:123
Nov 05 07:27:57 andy-pi ntpd[14031]: Listening on routing socket on fd #23 for interface updates
Get GPS to feed NTP
Now that the updated binaries are running, we can update the
/etc/ntp.conf file to add our GPS sources.
Add these lines into the /etc/ntp.conf file before the first set of servers.
## Access time from the serial port through GPSd shared memory
server 127.127.28.0 minpoll 4 maxpoll 4
fudge 127.127.28.0 time1 0.000 refid GPS stratum 1

## Getting time from the PPS source
server 127.127.22.0 minpoll 4 maxpoll 4
fudge 127.127.22.0 refid PPS
Due to the nature of the serial interface, the time received will be
skewed slightly. This offset can be seen when we query ntp. What it
will average out to be will very from device to device. The above
setting in the fudge line (time1 0.000) does not attempt to fix
this. After running for a while, you can determine the average offset
and adjust the fudge factor accordingly.
With PPS at least one of the other servers must have the prefer option added to the end of the server configuration line. For example:
server 0.debian.pool.ntp.org iburst prefer
You can now restart ntp by running sudo systemctl restart ntp then
query your local system.
/usr/local/bin/ntpq -crv -np
This should produce an output similar to:
associd=0 status=0115 leap_none, sync_pps, 1 event, clock_sync,
version="ntpd 4.2.8p8@1.3265-o Thu Nov  3 06:42:56 UTC 2016 (1)",
processor="armv7l", system="Linux/4.4.30-v7+", leap=00, stratum=1,
precision=-19, rootdelay=0.000, rootdisp=1.105, refid=PPS,
reftime=dbc81d6b.fbaf39fe  Sat, Nov  5 2016  8:57:15.983,
clock=dbc81d73.b03b2fa7  Sat, Nov  5 2016  8:57:23.688, peer=22925, tc=4,
mintc=3, offset=-0.020934, frequency=-15.259, sys_jitter=0.003752,
clk_jitter=0.326, clk_wander=0.005
     remote           refid      st t when poll reach   delay   offset  jitter
==============================================================================
 127.127.28.0    .GPS.           15 l    9   16  377    0.000 -487.026  26.763
o127.127.22.0    .PPS.            0 l    8   16  377    0.000   -0.002   0.004
*91.198.10.4     31.28.161.68     2 u   15   64  177  212.512    3.263   0.429
+131.188.3.220   .GPS.            1 u   16   64  177  179.928   -1.950   0.395
+2600:3c01::f03c 132.239.1.6      2 u   16   64  177   27.864    0.141   0.702
+209.208.79.69   130.207.244.240  2 u   15   64  177   96.558    0.410   0.173
The reach value should eventually get to 377. A reach value of 0
(zero) indicates that ntp can not query those sources. It may take a
upwards of a minute before the PPS and GPS shared memory sources
actually return anything. So run the ntpq command a few times to
see if the reach value increases from 0 before tweaking your
/etc/ntp.conf or restarting the ntp daemon process.
Fudging the Numbers
The GPS feed on the serial line will most likely be offset far enough from true that ntp will not use it as a peer. This can be seen
After running for a while with a fudge factor of 0.000, I could take
an average from the offset shown by ntpq -np. In my case, the
offset average offset was -543.241 ms. From this average, I modified
the /etc/ntp.conf to mitigate the offset with a value of +0.543
(seconds).
fudge 127.127.28.0 time1 +0.543 refid GPS stratum 1
After making the above change and restarting ntp, the GPS over serial values came inline enough to be a legitimate peer to the PPS. This is useful for getting time set when the Pi does not have an Internet connection. The GPS peer will still have an offset variance, but by setting an appropriate fudge factor, it becomes usable.
/usr/local/bin/ntpq -np
     remote           refid      st t when poll reach   delay   offset  jitter
==============================================================================
*127.127.28.0    .GPS.            1 l    9   16  377    0.000    4.716 200.577
o127.127.22.0    .PPS.            0 l    8   16  377    0.000    0.004   0.001
+208.100.29.180  216.86.146.46    2 u   15   64  377   75.343    1.399   3.002
+67.227.252.196  64.113.32.5      2 u   13   64  377   97.849   -1.609   0.915
+2600:3c03:e000: 192.96.202.120   3 u   18   64  377  125.180   -3.032   0.415
+198.55.111.50   208.75.88.4      3 u   14   64  377   36.433    0.441   8.610
References
- Adafruit Ultimate GPS on Raspberry Pi
- The hardware I used, but anything that provides PPS and the NMEA protocol, you’re probably okay. But check the gpsd hardware guide for devices that have been tested.
- The Raspberry Pi as a Stratum-1 NTP Server – Very detailed guide for various methods of hooking a GPS to a Pi.
- Raspberry Pi quickstart – Slightly shorter version of the previous.
- ntpq -p output – What do all the columns from ntpq mean.
- Monitoring NTP remotely
- nptstats-graphite – Send NTP stats to Graphite.
- Getting GPSd to work with Python – An example Python program to communicate to GPSd.