In my previous post, I walked through getting Blogger pages moved to GitLab. The impetus for my move was so that I could enable TLS for my blog pages. In this post, I will go over getting a Let’s Encrypt certificate installed. I’m running this from a Mac, so not all the commands will be precisely the same from a Linux or Windows host.
By utilizing the EFF’s Certbot we can have an SSL certificate generated, validated, and signed to be used with out GitLab pages. The validation process requires that we have a special page availble from our site. The name and content of this page is generated by Certbot, but the page location is the regardless of GitLab or any other hosting method.
Prepare Your Gitlab Pages
To accommodate the Let’s Encrypt HTTP validation method, we need to take some steps on the GitLab side of things. In the root your local GitLab repository perform the following:
$ mkdir le
$ git add le
$ git commit -a -m "Temporary Let's Encrypt directory used for validation files."
Modify your .gitlab-ci.yml file to add the following lines under the
script: directive.
  - mkdir -p public/.well-known/acme-challenge/
  - cp le/*  public/.well-known/acme-challenge/
Or as mine currently looks:
image: ruby:2.3

pages:
  script:
  - gem install json
  - gem install rouge
  - gem install jekyll
  - gem install jekyll-sitemap
  - gem install jekyll-feed
  - gem install jekyll-paginate
  - gem install jekyll-gist
  - jekyll build -d public
  - mkdir -p public/.well-known/acme-challenge/
  - cp le/*  public/.well-known/acme-challenge/
  artifacts:
    paths:
    - public
  only:
  - master
Now commit and push your changes to GitLab and validate that your build still works.
Get and Run Certbot
Certbot is a python application developed to script many of the operations necessary to get, renew, and manage a Let’s Encrypt certificate. It works best when run on the webserver that serves the domain we are generating a certificate for, but we can work around that.
From our Mac terminal window.
$ brew install certbot
I’m not a fan of running certbot as root, so you need to prepare some bits before running. Otherwise, it’ll bomb out with permissions problems.
Make some directories…
$ mkdir -p ~/tmp/certbot/logs
$ mkdir -p ~/tmp/certbot/work
$ sudo mkdir -p /etc/letsencrypt/
$ sudo chown [YourUserName] /etc/letsencrypt/
Create a config
In your favorite text editor create a cli.ini file with contents
similar to the following:
text = True
domains = [your, list, of, domains]
email = [your email address]
renew-by-default
agree-tos
rsa-key-size = 4096
logs-dir = /Users/[YourUserName]/tmp/certbot/logs/
work-dir = /Users/[YourUserName]/tmp/certbot/work/
Run Certbot
Step 1 with many parts
$ certbot certonly -a manual -c cli.ini
Saving debug log to /Users/something/tmp/certbot/logs/letsencrypt.log
Starting new HTTPS connection (1): acme-v01.api.letsencrypt.org
Obtaining a new certificate
Performing the following challenges:
http-01 challenge for www.example.com

-------------------------------------------------------------------------------
NOTE: The IP of this machine will be publicly logged as having requested this
certificate. If you're running certbot in manual mode on a machine that is not
your server, please ensure you're okay with that.

Are you OK with your IP being logged?
-------------------------------------------------------------------------------
(Y)es/(N)o:
Enter Y and hit return
Make sure your web server displays the following content at
http://www.example.com/.well-known/acme-challenge/1j-ronLqg5OfLqWZ1CiPUq9TfLDhQ6mh28DGH1_9p4s before continuing:

1j-ronLqg5OfLqWZ1CiPUq9TfLDhQ6mh28DGH1_9p4s.wyMCCkUN6yUmKBQ7NEJJNtLnXmaTmlbRoIL2TNcIj-s

If you don't have HTTP server configured, you can run the following
command on the target server (as root):

mkdir -p /tmp/certbot/public_html/.well-known/acme-challenge
cd /tmp/certbot/public_html
printf "%s" 1j-ronLqg5OfLqWZ1CiPUq9TfLDhQ6mh28DGH1_9p4s.wyMCCkUN6yUmKBQ7NEJJNtLnXmaTmlbRoIL2TNcIj-s > .well-known/acme-challenge/1j-ronLqg5OfLqWZ1CiPUq9TfLDhQ6mh28DGH1_9p4s
# run only once per server:
$(command -v python2 || command -v python2.7 || command -v python2.6) -c \
"import BaseHTTPServer, SimpleHTTPServer; \
s = BaseHTTPServer.HTTPServer(('', 80), SimpleHTTPServer.SimpleHTTPRequestHandler); \
s.serve_forever()"
Press ENTER to continue
Before you hit enter, we need to take care of some business. The
above text specifies the validation file we’ll need to host. In a
different Terminal window, you’ll need to complete the next few steps.
In the le directory we created earlier, run a modified version of the printf command specified above. Like so:
$ printf "%s" 1j-ronLqg5OfLqWZ1CiPUq9TfLDhQ6mh28DGH1_9p4s.wyMCCkUN6yUmKBQ7NEJJNtL
nXmaTmlbRoIL2TNcIj-s > 1j-ronLqg5OfLqWZ1CiPUq9TfLDhQ6mh28DGH1_9p4s
Notice that in the version we run, the .well-known/acme-challenge is
removed from the destination filename. Our gitlab-ci.yml will take
care of moving the file to the appropriate location. We just need to add and push the file up to GitLab to make this happen.
$ git add *
$ git commit -a -m "Let's Encrypt validation files."
$ git push
After pushing, watch the CI build process to make sure it completed.
Then you can test to set that the file is served from http://[your
site]/.well-known/acme-challenge/. If not, check to make sure you’ve
created and properly committed the challenge file into your GitLab
pages /le directory and you .gitlab-ci.yml is also up to date.
Once you have confirmed that the challenge file is available, you can go back to your certbot terminal window and hit enter.
Starting new HTTP connection (1): www.example.com
Waiting for verification...
Cleaning up challenges
Generating key (4096 bits): /etc/letsencrypt/keys/0003_key-certbot.pem
Creating CSR: /etc/letsencrypt/csr/0003_csr-certbot.pem
Non-standard path(s), might not work with crontab installed by your operating system package manager

IMPORTANT NOTES:
 - Congratulations! Your certificate and chain have been saved at
   /etc/letsencrypt/live/www.example.com/fullchain.pem. Your cert
   will expire on 2017-01-25. To obtain a new or tweaked version of
   this certificate in the future, simply run certbot again. To
   non-interactively renew *all* of your certificates, run "certbot
   renew"
 - If you lose your account credentials, you can recover through
   e-mails sent to andy@example.com.
 - Your account credentials have been saved in your Certbot
   configuration directory at /etc/letsencrypt. You should make a
   secure backup of this folder now. This configuration directory will
   also contain certificates and private keys obtained by Certbot so
   making regular backups of this folder is ideal.
 - If you like Certbot, please consider supporting our work by:

   Donating to ISRG / Let's Encrypt:   https://letsencrypt.org/donate
   Donating to EFF:                    https://eff.org/donate-le
Congratulations. You now have a 4096bit RSA SSL certificate, that’s signed by a recognized public CA, and it’s valid for 90 days. Now you just need to get it setup with your GitLab pages.
Note: If you have multiple domains that you are entering into your Certificate request (e.g. www.example.com, example.com), then you’ll have each of those domains listed in the configuration. You will also cycle through the challenge/validation process for each of those domains when you run certbot.
Update GitLab with your Certificate
In the GitLab Web UI, navigate to your Pages project. Then click on
the gear icon and Pages. 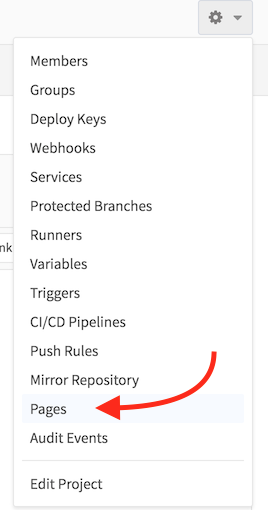
Unfortunately, there is no way to add or update a certificate for an
existing domain. You will first need to remove your domain. Then you
can click the  button.
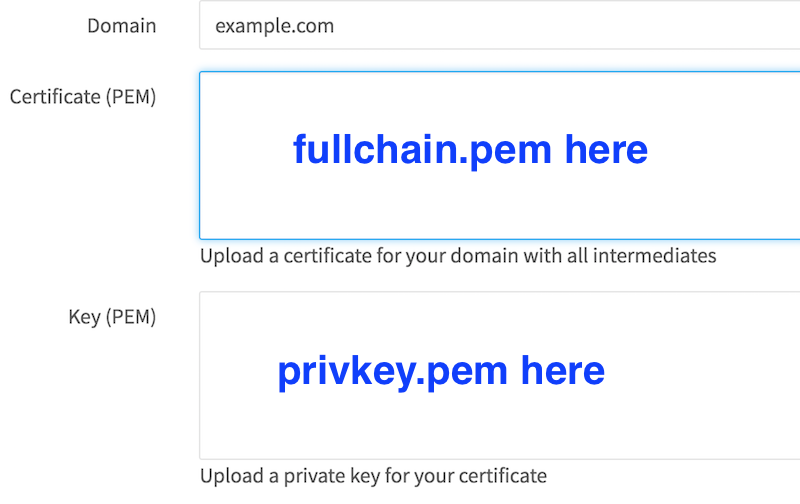
On the page that comes up, you will enter your domain name, and
copy-and-paste the private and full chain keys into the appropriate
boxes. You can find the keys in the
/etc/letsencrypt/live/[yourdomain]/ directory. You will want the
privkey.pem and fullchain.pem files.
After clicking the Create New Domain button, you should be able to
hit your site a https://[yoursite]/ with your new certificates. As
mentioned, the Let’s Encrypt certificates are only valid for 90 days.
In a future post, I’ll go over the renew process and how to hopefully
make this less painful.
“Forcing” HTTPS
Gitlab does not force HTTPS. So even with the certificate installed, browsers can hit your pages in an insecure HTTP fashion. We can work around this a bit by throwing some JS into our pages that redirect people to the HTTPS version if they hit us over HTTP. It’s less than perfect, but it is better than nothing. The Javascript code, with some Jekyll wrappings looks like the following:
{% if site.enforce_ssl %}
<script type="text/javascript">
if (window.location.protocol != "https:")
        window.location.protocol = "https";
</script>
{% endif %}
For my theme, I added this code to the _includes/scripts.html file.
The Jekyll if statements, means that I can have a config that doesn’t
require SSL that I use on my local machine for testing and development.
For my deployment to GitLab, I updated the _config.yml file
enforce_ssl: true was set. Push these two changes to GitLab then
updated my pages appropriately, activating the above JS, and for any
modern browser with Javascript turned on, they will get redirected to
the secured version of my pages.
In my next related post, I’ll go over renewing your certificate. Since this has to be done every 90 days, automating the process is a good idea. On webservers where certbot can run, this is fairly trivial. With Gitlab pages, we have a few more hurdles to jump over.